Showing posts with label crafts. Show all posts

Life: Hi!


Some new crafty things and a hello from me. 

Crafts: That dreaded rug

Remember that one time when I said I was going to make a rug?

IMG_3292

No?

Well I can't blame you as that was 8 months ago.

But it's almost done, I just have a very small handful of squares to fill. And while it didn't turn out how I wanted (I had to cut down on the size because of a lack of fabric), I can at least say I did it. And Emmett absolutely loves it and that's enough for me. I'll be posting the finished product within the week. So keep and eye out!

Crafts: Winter wreath

Just a new wreath that I was able to throw together in under 30 minutes (would have been faster if I hadn't had to paint the wreath form).


Hope everyone's holiday season is off to a wonderful start!

Crafts: Meltable art

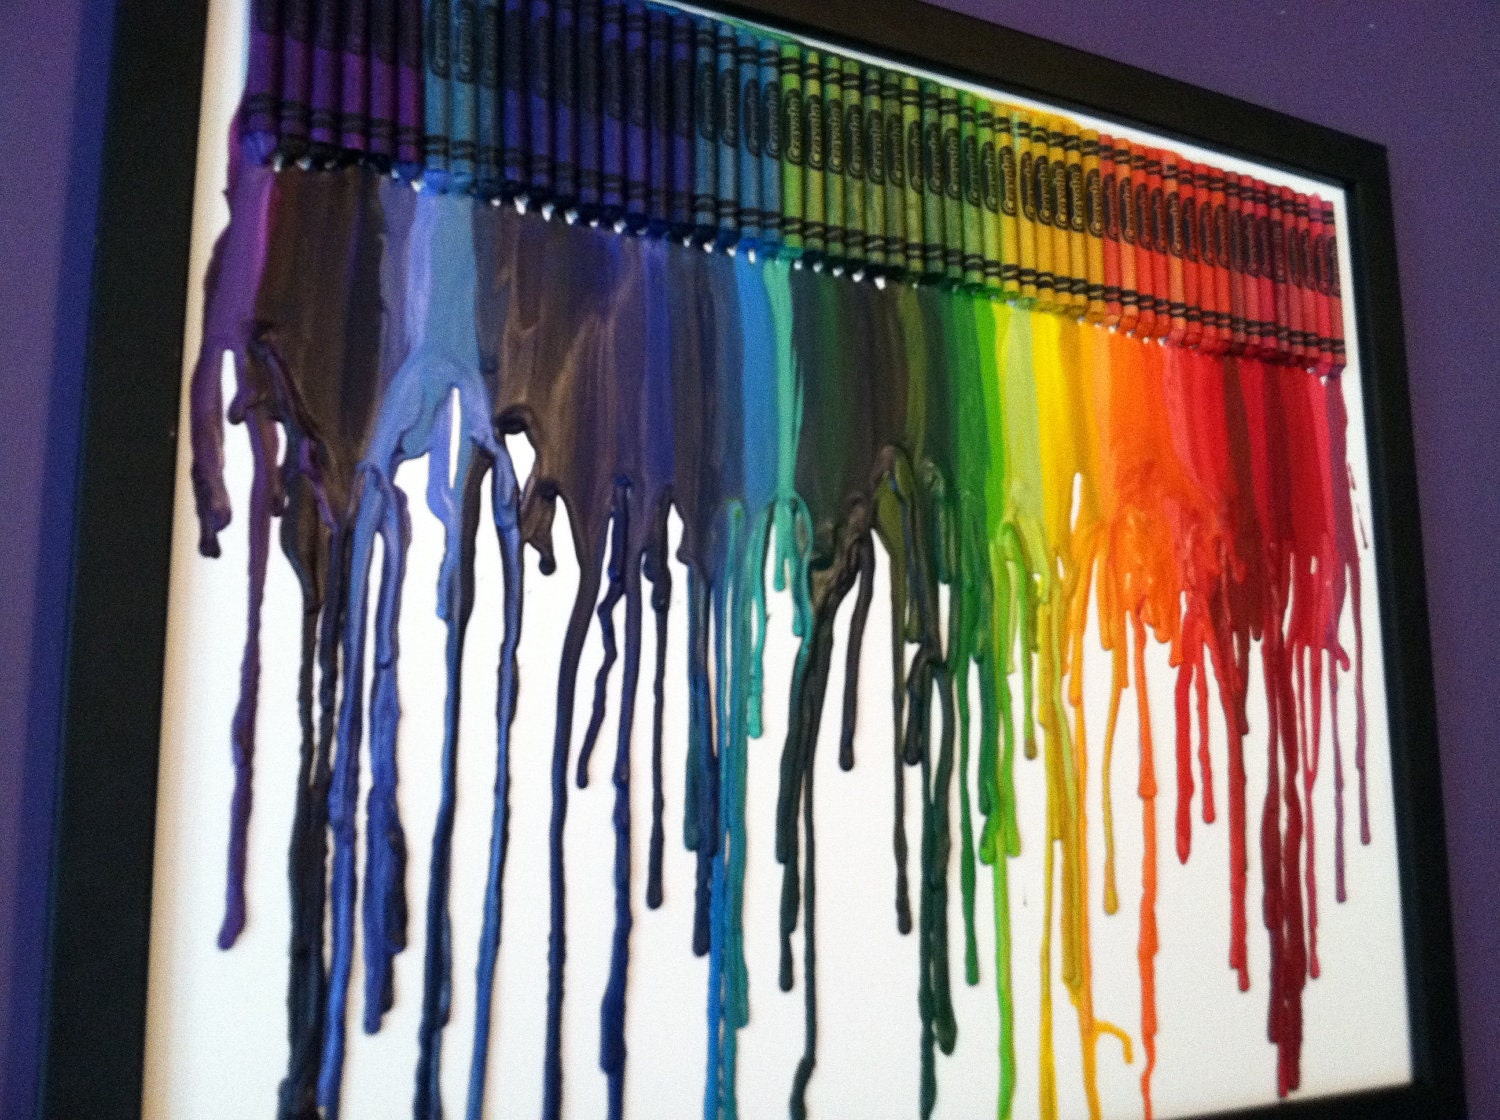
As stated a few weeks ago, Nate and I started a craft project together. That project was the very popular melted crayon art. It was something that I found on Pinterest and when I showed it to Nate we somehow magically ended up with boxes of crayons and canvas. Nate's always looking for something crafty that he can do, because sometimes he feels that being an awesome baker isn't enough.

I set to work, gluing on the crayons.

IMG_3733

A lot of the DIYs I found were using hot glue...and while I do LOVE me some hot glue, I decided to go with super glue. It didn't seem logical to use a glue that melts with heat on a project that gets melted with...heat.

IMG_3714
IMG_3721

I lined up all of the crayons with the logo up in my best attempt at ROYGBIV.

IMG_3724

We then headed outside with my blowdryer.

IMG_3725

Nate was super excited...


Especially when it started working.

We worked on the crayons for awhile, but while a hairdryer gets hot, it doesn't get hot enough to make the melting process happen quickly. We also didn't like that the force of the air was pushing around the wax. It was making for a splatter-y look that nether of us liked. Nate kept saying that a heat gun would be perfect for this job and that's when the light bulb went off in my head. I went and grabbed my embossing gun.

It was perfect. A little too perfect. Lets just say that if you let the embossing gun stay in one spot for too long...the paper wrappers would start smoking. Once we figured out the prime distance and sweeping motion we were golden. We were really able to start get the look we were looking for. Melted, layered wax.

After we had a good look going on, we decided that we didn't love all of the white space left at the bottom of the canvas. We didn't want to lose the layered look we had going, so we decided to add crayons to the other side of the canvas.

IMG_3732

Seeing as I had glued the other row with the label up, I had no idea what colors what the colors were and I wanted to line them up the same on both sides. So I set to work laying the fresh crayons on top of the melted.

IMG_3734
IMG_3738

Again, I glued them down with super glue. I glued this row with the color name up, so you can see which color is which. At this point I totally took over. Nate had his fun and it was my turn!

IMG_3757

Watching the wax melt, drip and pool was beyond entertaining. I kind of want to do 20 more just so I can play with the wax. Though with as anal as I am...I did melt and remelt the wax a lot. I like finding perfection in chaos.

IMG_3788
IMG_3787

I must say, it was an easy craft...unless you are me. I did, after all, say that I like things to be perfect (or what is perfect to me) and it was easy for me to get carried away. I wanted to add my personal touch, which was the super layered look. We also love that we can hang the art a few different ways. Though having it sideways so that the crayon drips look like they are fighting gravity is our favorite way to hang it.

IMG_3744

Anyone who knows me, knows I am a sucker for texture. And once I figured out that you could layer the wax...I went to town. Hello texture!

Honestly, this was one of the easiest crafts I have done recently. It's even easier if you aren't crazy anal like I am. I mean if I weren't so crazed I probably could have had this done in hours instead of 4 days of messing around. What can I say...I find ways to make simple things harder than they should be!

Edit: I forgot to mention some things...

...Use Crayola Crayons because the cheap ones just won't cut it (we didn't test this, but we have seen self admitted fails from other people that used brands like Roseart). Also, while the canvas was good it wasn't perfect. With the canvas having an open back the wax had a tendency to crack or pop off if disturbed too much. You can fix this by placing something solid (like cardboard) in the opening. Or you could just attach the crayons to foam board and then place the foam board in a frame. It's really personal preference. And last thing, seal your wax with a clear coat. It should help lock the wax in place and hopefully keep it from melting (not that our house would ever get that hot).


So what do you think!?

Crafts: Melting


{via}


By now...if you spend any time on Pinterest or really just on the internet you've seen this artwork from Etsy seller JKCreate. They take crayons and melt them onto canvas. This has quickly turned into a huge DIY across the internet and I jumped on board when Nate saw it. As he put it, "it's a craft even I can do!".

So last week we set out to make it. We're not quite done yet, but here is a sneak peak at what it looked like when we started.


Once we're done, I will get more pictures posted and let you all know what worked best for us to make it.

Crafts: Making a rug

Since I joined Pinterest, I have found many new things that I love and want to try. I've also re-found some things that I had wanted to try, but simply forgot about.

One of those things was the t-shirt latch hook run tutorial over at Xoelle. I loved how her rug turned out and I stored away the idea in the back of my head. Then I forgot. But Pinterest reminded me about the run, when it popped up in a feed. My mind raced as I set my mind to making my own rug. I even told Nate about it...and he thought it was cool. That was all I needed.

We went to our local Goodwill Outlet and looked for shirts...but apparently the store felt they were worth $1.50 each. But that's okay, because we didn't leave totally empty handed.

After thinking about it, Nate and I decided that using jersey bed sheets would work just as well. Plus Target sells a set from their RE line for $25. So I grabbed a king sized sheet set and all of the other things I needed and I set off on my project. While I could have kept looking for t-shirts so that I could have dyed the rug the exact color I wanted, I like working with the sheets, because I don't have to deal with dye.

Itemsforrug

So far the the most annoying part of doing this is cutting the strips. I feel like it's the longest part of the process. Luckily, Nate is more than willing to help. So while he cuts, I can get to latching.

Starts of rug

It's going to take awhile...and I have moments where I feel that I have totally lost my mind for doing this. Then I touch the patch I have done and I just can't wait to bury my toes in a rug that I made.

IMG_3290

IMG_3281

Of course after I started with the yellow, Nate and I both decided that we wanted to add in another color. So we decided to add in a dark gray.

It may take awhile to finish this, but I promise to post occasionally about how it's going. I'm really excited to finish this...I mean I'll get to say that I made a rug. Yeah, that's pretty awesome.


Crafts: A gift for a baby shower

A little over a week ago I went to a baby shower for a friend. I got the cute baby basics (can we say yellow striped summer dress with blue/white polka dot edging and bloomers!?), but I also wanted to make something for the mother-to-be. Mostly because she had told me that she wasn't really sure that she was going to decorate much. I got to work thinking up ideas for some sort of room decoration that can be easily moved and matched the bedding.

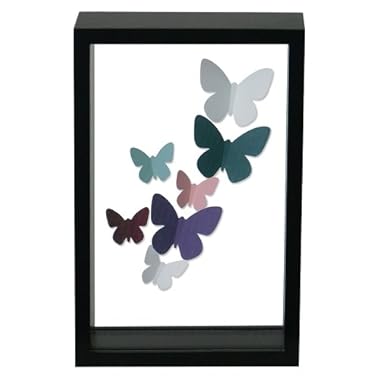
I had been wanting to do some sort of wall art that incorporated the use of paper punches. This desire was pushed into the "must do it" when I came across a very very similar idea at Target.


Part of the Fanciful Collection, this guy is in a all glass shadow box that you can see all the way through. There is also a smaller one as well. While they are cute, I definitely wanted to make something myself. So off I went to gather all of the tools I needed. Lucky me I had everything I needed (who says stock piling doesn't pay off!?).

IMG_2984

I gathered papers in the colors of the bedding in all different patterns and shades. I then picked through the paper, picking the ones I thought would work best. I ended up using all of the same linen textured papers (minus the green with purple print). I already had the butterfly punches and glass shadow box.

Fun fact...see that "awesome" family picture on the one pane of glass!? Yes? Well it's pretty much hermetically sealed onto that very very very very thin piece of glass. It may never actually come off of the glass...ever. I mean who the heck does that!? I get that it's there to give you ideas...but to glue it on so much that it won't come off easily is asinine! Lucky for me I had a second IDENTICAL shadowbox. Now when I say identical, I mean I bought it at the same time, from the same place, the same company made it and it was the same exact size. So the glass should fit right!? RIGHT!?

Hahahaha.

Nope.

After I sat there placing every butterfly and then re-placing them with glue dots onto the pane of glass, I went to place the glass into the frame.

It didn't fit. Yeah I probably should have checked that, but silly me thought that glass from two identical frames would be interchangeable. Yeah right. So something that should have been one of my easier to do crafts just found a way to be very very difficult. I may have freaked out a lot. I just perfectly placed every butterfly on glass. Very very thin glass. After I finished cussing like a drunken sailor, I went upstairs to go to bed and cool off. My husband stayed up and sanded an edge of the glass down so that it would fit into the frame. I think he really loves me or something. That and he probably wanted me to not wake up pissed in the morning.

In fact, the next morning I only cussed lightly about the fact that it was dumb that there was that much of a difference, but it passed quickly. I cleaned up the glass and didn't cut myself...which probably would have sent me off into another tizzy and got everything wrapped up.

IMG_3020

IMG_3025

IMG_3038

IMG_3039

The wrapping incorporated the colors yet again and used up the last of the green/purple paper. I actually didn't make the topper (shocking I know). I got that from Anthropologie a few years back, because they give out awesome holiday wrapping stuff...when you buy something of course.

And because I was feeling better about the frame fiasco, I made a matching card!

IMG_3031

IMG_3032

Minus the setback, I was so happy with the way the frame came out! I love it so much that I think I am going to have to make something similar for somewhere in our house. I may not do butterflies, but I want to do something!

I may be buying a different shadowbox though.

DIY: book page ball

As promised...here is my first post about one of the many things I made for the Valentine's wine tasting.

First up is my book page ball. As seen here...

IMG_2954


This project came about when I felt like I hadn't done enough to decorate. Ha yeah...I have moments. This project also made me realize that for all of the paper punches that I have, I pretty much have no basic shapes (circle...square). So after a quick trip to a craft store I had a brand new punch.

Once I gathered my supplies I was ready to start. Here's what I used and what you'll need to create your own...

IMG_2932

You'll need:


~An old crappy book (like the one I got from Goodwill)
~Round paper punch (mine is 3 inches)
~Styrofoam ball (mine were 2 and 3 inches)
~Hot glue gun
~Pencil

Pretty much start punching out circles with your punch. Keep punching. Then punch some more. When you think you have enough, punch even more. I didn't count how many circles I used, but lets just say it was a lot.


IMG_2934

IMG_2936

Take paper circle and pencil. Place pencil in center of circle and fold around the base of pencil.


IMG_2937

Place a drop of hot glue on the ball and press the paper and pencil into the foam*. Hold for a second while the glue cools.

*If you want you can put the hot glue onto the paper and then press into the foam. I use that technique when I'm at the very end and the foam is disappearing.


IMG_2938

Place the paper as close as possible to make sure that none of the foam shows through.


IMG_2939

Just keep adding paper until it is filled out.


IMG_2940

What it looks like when it is all done!

I also rolled the ball around on the table which softened the edges of the paper. You by no means have to do that though.

Now that you are done...go make more and place them all around your house! You can place them in bowls or add ribbon/string to them so that they can be hung. Do whatever you want with them! They are super easy to make, they just take a little time because of the repetitiveness of the steps.

I really love them, not only because they look awesome, but because I can use them year round. Always awesome when that is possible!

So go out and get some books and have at this craft! You'll be happy you did!

Decor: Valentine's wine tasting party

After lots of planning and decorating and stressing, we finally had our wine tasting party.

It was wonderful! We had so much fun!

We used this as a chance for everyone to dress up a bit, because really there are just not enough times in our life that we can wear nice clothing. Honestly what happened to our generation and our lack of desire to dress up!? It is a travesty. But that is a whole other rant for another time.

Anywho, along with it being a dress up occasion, we asked everyone to bring a favorite wine and fruit/cheese pairing. With there being 7 couples, it meant that we got to try a good amount of different wines!

Most of the tasting was held in our dining room, so of course that is the area that was decorated the most. I made those paper garlands that I sewed on my machine and pom poms that were then glued onto paper covered wire to make them look like flowers. We also made two different gifts for our guests. One of them being slate tiles with felt on the bottom. We used those as plates to set out the food pairing, but we use them as hot pads (trivets) in our house. We also did simple things like turning corks into place card holders, which we then asked our guests to use to let us know what they had brought.

IMG_2950
Side table

IMG_2951
The wines and pairings (which are sitting on their slate tiles)

Throughout the rest of the house there was more of the paper garland and pom poms, as well as the fabric and paper rosette balls I made. They were little touches, because we didn't want to go too overboard.

IMG_2924
Even our chalkboard wall got into the action!

IMG_2973
A wreath made from a feather boa and paper garland sat above our sink in the kitchen

IMG_2954
The pom pom flowers and fabric rosette balls.

IMG_2968
The candle holder got its very own little mini dangling garlands.

IMG_2942
The gifts for the guests all wrapped up and waiting to go home.

This party was my most DIY oriented party I have every thrown. Almost everything we used to decorate and give as gifts were hand made. It was stressful at moments, but so worth it to have such a wonderful night with friends. I enjoyed it so much, that I want to make this into something we do somewhat frequently. My mind is already racing with ideas!

Because of all of the DIYed stuff, check back this week for some more in depth how tos and DIYs!

So have you ever been to a wine party/tasting? Did you have fun? Have you ever planned one? If so, what did you do?

Crafts: Books by the pound

I needed old books...or at least books that I wouldn't feel awful about cutting up. That meant a trip to our Goodwill outlet. If you haven't been to a Goodwill outlet...then let me just say that it's a special place.

A very special place.

It's where the unwanted things from normal Goodwill stores go to die. Yes...there is a place where Goodwill sends their really bad stuff. Take away shelves and replace them with huge rolling bins that get filled full of anything and everything. There is lots of digging. Then to make it even more odd, you pay buy the pound for things. Yep folks you read that right.

By.The.Pound.

Lets just say 65¢ a pound for books is awesome!

So now I have lots of this...


{via}

Which means I can now create my paper heart garlands! I'm very excited, because we are going to be using them for our Valentine's wine tasting party!

I can't wait to share all of the goodies that we are going to be making to help us decorate. So check back!

Crafts: Dissecting the fleece rosette wreath

Remember how I took this...


{via}

And these...

IMG_1194

And made this...

IMG_1235

If you don't remember about it, you can read about it here. Heck even if you do remember you can still go back and read about it! Anywho, now I am trying my hand at something else using Styrofoam, pins and fabric circles.

All that's different is that I'm using these...


{via}

"These" being Styrofoam balls. And I am covering them in different red and black fabric.

What to chance a guess at why I'm making them?

Don't worry...I'll post the finished project soon!