Fashion: Getting back into accessorizing

1/31/2011 06:00:00 AM Ashley 4 Comments

Saturday night we decided to go our with friends for dinner. It was very last minute, but totally worth it, because restaurants around town were putting on a "restaurant week" which allows you to try new places for much cheaper then normal. We went to L'Auberge, a local fine dining French restaurant.

The fine dining part, of course, sent me into a tailspin of panic. What's a girl to do when she has tons of dresses...that don't actually fit currently!? Luckily, there was a shining hope in my closet. A yellow/taupe color block dress that I bought from Ann Taylor last spring. Even better...it fit perfectly and I didn't feel fat in it! Side note: Sometimes it's really amazing what even a ten pound loss can do for your body.

As soon as I settled on the dress, the rest of my outfit just fell together. I just love it when that happens. I even got excited about accessorizing, which hasn't happened in a long time. Because of the high cut of the neck, I decided against a necklace. Instead I went with some brooches, which I clumped together and pinned, off center, onto the belt of the dress.


All of my brooches are antique/vintage with aurora borealis stones. Actually...on one I used a fun "cheat" that I love doing when I can...

...the smaller round one on the top is actually a clip on earring! It's such a great way to incorporate them into your wardrobe. I also love clipping them onto shoes for some added fun! So now you have a few ideas for what to do with them if you collect full vintage sets of jewelry!

IMG_2844

IMG_2843

It was a fun night. Not only was it great to get to try a place that we may have never normally eaten at, but I also was able to pull myself out of my outfit funk. Ever since I gained my weight, I haven't been as in love with putting together outfits, which I lived for. So it was nice to be able to put together a whole look and know that I still have an eye for style!

I hope everyone had a great weekend!

4 comments :

Beauty: The never ending salon search

1/26/2011 01:48:00 PM Ashley 9 Comments

I got my hair cut today. It's been a long six months since I stepped foot into a salon. I've talked about my salon issues here and here, in case you were wondering. And I've also talked about how I do know better than to wait six months...or a year to get my hair done.

Here's the issue. I hate, no make that loathe, trying to find a salon and stylist that I like. It's like dating to me. It's tedious. I mean, you have to trust them to not only cut/style your hair well, but you have to connect with them. You are, after all, spending anywhere from one to 3 hours there.

So after putting off my search for a new salon here in Ohio, Nate was nice enough to purchase a Groupon for a salon offer. After he got it for me, it took me 4 months to use it. Which got me to thinking, what is going on with me!? I use to love getting my hair cut and colored. In fact I giddily looked forward to it. I love playing with cut and color as I have never been one who is that attached to my hair (it does grow back after all). What happened?

Well a few things...first is that I moved away from Colorado, where I had an amazing stylist. Then I went through many issues with different places in Albuquerque. Then I found a new perfect stylist in Denver, CO. Slight issue with that...I am nowhere close to Colorado now.

Major sad face.

I've just gotten use to lack luster salons and boring stylists. So my love of all things hair has...well gone frizzy.

What is it that I want you might ask? Well I want a stylist that knows what she is doing. My stylist annoyed me today because she asked me too many questions without giving back much feedback. She never really talked about what she wanted to do, or why she was doing it. I want the stylist to listen to what I want, but also give me ideas. If they aren't inspired then I am definitely not going to be inspired. If I say that I like to play with hair and that I'm not overly attached...get excited that you have someone you can play with. Also...if it's a slow day, do not all stand around and talk. Especially if you are my stylist.

Also, I want the salon to feel like a get away. I know you can find great salons in strip malls, but come on...make it feel less like one. I want to go somewhere that I can relax and get away from myself. I want to walk into a place and know, just from how it looks, that I am in a creative environment.

I will say that my haircut wasn't awful, but I didn't leave excited or invigorated. Though I honestly I haven't felt that way for a long time. Which is sad, because I need a mood changing hair cut badly. I was ready to chop off a few good inches, but quickly realized that today's salon was not to place to do it.

All this means is that I have to search more. Bleh. But I'll do it, because I need a fun change, be it the length of my hair or the color.

And so my post isn't totally boring, here are some of my favorite cuts and colors that I have had over the years...

Bamboo background
I keep debating about going back to this color and length, but I just don't know. Thoughts?

bluetree

Still me

IMG_0522
This was the last professional color I got. It was amazing and fun because of the chunky copper highlights. I also had blunt bangs with this as well.

20081012_Ashley_and_Nate_0321


So, my readers I leave you this...how have you pulled yourself out of your hair blahs? Any tips for finding a good salon? Is there is a hair cut amongst these pictures that you like and think I should do again?

9 comments :

Life: Issues with living in old base housing

1/25/2011 08:30:00 AM Ashley 0 Comments

IMG_2829

I wish, truly wish, that there were a funny story to go along with this photo. Yes, that is the bottom rack of my dishwasher in my guest bathroom. Sometimes in life you have to deal with stupidity, as in the stupidity of people that work for our base housing. Meaning, this photo started with a simple issue that turned into a "this can't be happening" moment.

This was such a "holy crap there is too much dumb" moment that I just had to share, because maybe you all can find some humor in this (something I'm still working on).

First a little background. We live in houses that were built in the 50's, but by no means are they those cute little fixer-uppers with character. They lean, sag, creak, thump, have inches of paint on the walls so that they are no longer even. Good news though, all of extra paint is pretty much hiding away the threat of lead paint! The houses were even given the name "Legacy" in hopes of us being so enthralled with a fancy name, that we wouldn't notice that we lived in old square issue filled boxes.

Yes, I am fully aware that we chose to live in these houses. We chose the older houses because we got a lot more space and really the new homes have their own issues as well. It is base housing after all. Sadly though it doesn't change the fact that these are old, cheaply, and dumbly made houses.

Dumbly? You might ask.Lets look at the fact that we live in Ohio...which gets cold in the winter. So WHY oh why would you build houses with water pipes on outside walls!? And why oh why would you not do everything in your power insulate said pipes when it comes to light that it's a major freezing issue.

Can you see where this going?

Yeah, our pipes froze. Though we couldn't be cool and have the ingoing freeze. Oh no no! They had to freeze in our outgoing pipes. Sweet. This of course happened in our kitchen sink, over the weekend. It wasn't a huge deal until the excess water started backing up into our dishwasher. It's really funny when you are scooping out water and knowing you can't dump it in the sink. Or...the sidewalk unless we want a mini ice skating rink out our back door. Luckily after a call to check to make sure we still had said issues, maintenance showed up.

This is where a simple issue turned into a HUGE issue.

How do you clear a pipe that may or may not be frozen? First you plunge it. Then you give my husband the fifth degree about what we've been slopping down the drains.

Oh I'm sorry...should I not be stuffing it with cotton balls and tampons!? My bad.

After all of the oh so very hard work on their part (insert huge amounts of sarcasm) They brought antifreeze into my house and then dumped it down the sink. Now let me say I was not home for this, my husband was. I think he was a little too baffled at that moment to say anything. But when I found out I just about flipped my lid. They brought antifreeze into my house that happens to have a dog in it. Some of you might be saying "Ashley didn't you say that your sink was draining into your dishwasher?", why yes I did. When we opened the door guess what we found...antifreeze in our dishwasher.

Brilliant.

Then they left, saying that they would be back with a drain snake. They just forgot to mention that when they said that they would be back, that they meant in 5 hours. Sans drain snake.

I was not pleased at all. Even less so when they came back and started talking to me like I was a small child when I called them out on the fact that they could hurt and or kill my dog with antifreeze. I was repeatedly told that it was RV antifreeze and that it wouldn't hurt us. While I repeatedly told them that antifreeze is antifreeze when it comes to being deadly to pets. Yes...I get that it would help with the blockage, but it's still not okay. Then...because these guys were beyond smart and they wanted to make sure that the blockage was clear, they ran our dishwasher.

Take that in for a second.

Now, not only was the bottom of our dishwasher coated, the whole machine was. They then stopped it and told us we should take our dishes out to be safe. Wait, didn't you you just tell us that this antifreeze wouldn't hurt us!? They then told us that all we had to do was run water for a bit to flush it out of the system and it would be completely gone, but that the clogging wouldn't be an issue because the pipes were now coated in antifreeze. Can we say TONS of contradictions!?

Oh and I would personally like to thank said maintenance guys for making my house smell like sweet antifreeze, OB and stale cigarette smoke. I think I might try to bottle that scent and sell it.

Now to come back to the beginning. Seeing as they ran the dishwasher with dishes in it and we had nowhere out of Emmett reach to put the dishes, they went to live in our guest bathroom, with the door shut. Now that we have run the dishwasher 3 times without anything in it other than bleach, we can finally put the rack back in the washer. Where we will now have to wash the dishes at least twice, if not more.

Maybe in a few weeks...or months I'll laugh about this. Right now though, I am fuming.

Dumb makes my head hurt.

Here's one last "artsy" shot of my bathroom turned dish rack room.

IMG_2837

Now you can never say that I haven't come up with new ways to decorate your bathroom!

0 comments :

Weight Loss: My new equipment conquer

1/24/2011 06:30:00 AM Ashley 0 Comments

I have had an enemy at the gym. And while I may have slightly won the battle today, I have no doubt that it will try to defeat me every chance it has.

I first noticed this exercise machine at both of the gyms on base. I was and have continued to be proud of myself for keeping up with swimming 3 times a week (or less based on the amount of snow on the ground), as well as working in the elliptical on non swimming days. But this machine taunted me. It looked easy enough...or so those really in shape 50-60 year olds led me to believe. They moved and glided on this thing, making it look fun. Oh but it wasn't. Then there was the name. I mean, how can something called the "Wave" be un-fun?

The fact that the small number of machines sat off to the side, like a group of forlorn middle school girls at a dance, should have told me something. Did that stop me!? NO!

I climbed onto the Cardio Wave and just about popped a blood vessel. I wasn't even 30 seconds in and the display blinked mockingly at me...telling me I needed to try harder. Not being one who likes being told what to do, I got off and called it a day. I told myself I would come back to it when I was stronger.

Yeah...stronger.

So what is the Wave? Some of you might be asking. Well...


The best way I can describe it is by comparing it to cross country skiing or skating (mostly speed skating). You stand on the foot pedals and push down and out to the side with one leg and then the other. Lets just say that your butt and thighs really feel it. Really.

It doesn't seem that hard until you're on it. Then you feel slightly dumb for not being able to properly work a machine. It may have also helped to have known that the higher the number (level) you pick...the easier it is. Keep that in mind if you ever come across one of these.

So after months of not touching another Cardio Wave, I dumbly decided to give it another go today. Now keep in mind that I had already done 2 miles on an elliptical (that's a lot for lil' old me).

I fought...and possibly grunted (I had headphones on) through one minute on level 1...aka the hardest level. Then was informed by a nice old man, that the higher the level the easier it is.

Awesome.

As I upped the level, my knees stopped screaming as much. Then they started screaming again, because damn is that motion a lower body killer. A whopping 15 minutes and 3 miles later, I just about fell off of the machine as I was trying to dismount it. It's hard to look cool and proud when you almost face plant into the cardio machine next to you. I gathered myself and, what I now loving call the Wave stumble, stumbled myself off to the locker room.

I'm proud of myself for getting trying out the Wave again. I can tell already that it is going to be a love hate relationship. With me mostly hating how much pain it has cause me. But it's good pain, or that's what I say to myself. So if you ever see one of these beasts at your gym, give it a try, even if it's just a for a minute.

And don't forget...the higher the number/level, the easier it is!

0 comments :

Decor: Master bedroom inspiration

1/19/2011 07:00:00 AM Ashley 0 Comments

After sharing my master bedroom wall issues with you all, I started searching the internets for ideas as well as talking to a friend who could see the room first hand. After tossing around some ideas (embroidery hoops with coordinating fabrics, empty frames, framed mirrors...), I decided to see if Google search would lead me to some ideas.

Mostly, I want to do something over each of our end tables that are different but have a similar feel to them. I wasn't really sure how to accomplish this, especially with the fact that I want to make sure it doesn't get to feminine. I was about to give up, when I started searching gradients.


This was just what I was looking for. Right away two ideas popped into my head...and they are hopefully both DIY. One involves me painting...which could be a laugh and a half, while the other deals with using paint chips. Pretty much I want the gradient look, but with two different textures (I'm big on textures). I'm also thinking about using fabrics as well, but that would probably be the most time intensive of them all.

What I really need to do is just gather all of my supplies and get to work. Guess that means I need to make sure that I have the paint colors, as well as grabbing a bunch of paint chips.

This project is...as you probably guessed...to be continued!

0 comments :

Life and Beauty: The bad shade of gray

1/18/2011 09:00:00 AM Ashley 6 Comments


{via}

Perhaps I shouldn't have been digging through my hair, and perhaps in a perfect world I wouldn't have to deal with roots and coloring my hair. One way or another, it happened.

A few weeks ago I found my first gray hair. Then I found another...and another...and way way too many more after that.

It shouldn't be that big of a deal, the logical part of me knows this. Yet here I am, every day, digging through my hair like some crazed maniac. Last night I found the mother load too. Right above both of my temples laid a gaggle...yes a gaggle of thin white hairs. So like anyone who isn't at all in their right mind, I stood there and tried to pluck them out. As if somehow I could wish hard enough for them to not come back.

I know I can color my hair, already do color my hair. Heck, I don't really know what my true hair color is seeing as I have colored it since high school. This would be the logical side trying to fight back to regain control. Crazy maniac side won't have it, because no matter how much I color my hair...those grays will be growing longer and more plentiful under the color.

Why does this bother me so much? Is it vanity? Is it the fact that I'm not 30 yet? I knew this was coming. My mom's side went gray early. So early that part of me is shocked that I made it this long. Yet here I sit...wanting to run to the bathroom to see how many more I can find.

I get that my gray hairs aren't going to magically turn me into some new or different person. Yet it still just has a way of making me feel old, as cliche as that is. And with so many other things in my life making me feel old, I just didn't want or need this extra thing. I feel like I should go drink, dance on bars and stay out till 3am to compensate. But that was who I was 6 years and a handful of grays ago.

Instead I will go out, buy a box of hair color or two, do everything in my power to not look for more grays and go to be no later than 11pm.

6 comments :

Crafts: Books by the pound

1/17/2011 02:14:00 PM Ashley 4 Comments

I needed old books...or at least books that I wouldn't feel awful about cutting up. That meant a trip to our Goodwill outlet. If you haven't been to a Goodwill outlet...then let me just say that it's a special place.

A very special place.

It's where the unwanted things from normal Goodwill stores go to die. Yes...there is a place where Goodwill sends their really bad stuff. Take away shelves and replace them with huge rolling bins that get filled full of anything and everything. There is lots of digging. Then to make it even more odd, you pay buy the pound for things. Yep folks you read that right.

By.The.Pound.

Lets just say 65¢ a pound for books is awesome!

So now I have lots of this...


{via}

Which means I can now create my paper heart garlands! I'm very excited, because we are going to be using them for our Valentine's wine tasting party!

I can't wait to share all of the goodies that we are going to be making to help us decorate. So check back!

4 comments :

Fashion: My Lucky Break

1/14/2011 06:59:00 PM Ashley 3 Comments

Say hello to my new friends...


They are my new pretties (Lucky Break) from Kenneth Cole. Which means that this is the first pair of shoes that I have bought in over 6 months! Lets just say that they were a little pick me up for a long trying week.

I so can't wait to pair these with ankle jeans!

You can buy them here.

3 comments :

Decor: Mirrors

1/12/2011 04:18:00 PM Ashley 0 Comments

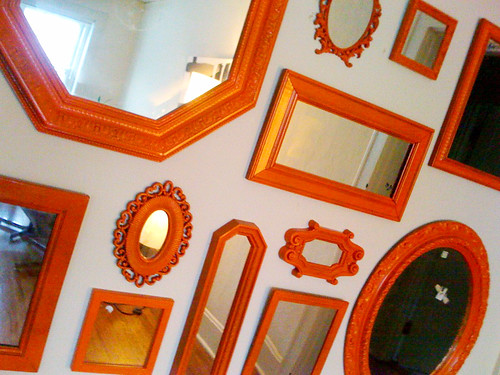
That's it...I want this wall. My own version of course.


I found this through here, because of a "Get the look" post on Etsy.

This, of course, means that I have to collect framed mirrors.

Seriously though, go check out that first link...his house is amazing and full of so much inspiration!

0 comments :

Decor: Master bedroom wall help

1/07/2011 08:10:00 AM Ashley 8 Comments

Well huh...

A few days ago I promised myself that I would actually get our bedroom put together properly and have been working ever since to get it done. Which, I mean is awesome, until I realized that are walls are awfully bare. Currently the only thing hanging on our wall is my earring frame and that's only because I hung it up last night.

We didn't have much of anything on the walls in our past house, but that really didn't bother me. Which is amazing because there was large expansive walls. But the room felt bright and happy, so I was lazy happy and didn't really hang anything on them.

But here...oh man...we have issues. Windows on the only two walls we can put furniture...so both are blocked by our bed and dresser. Two sliding door closets on the other wall. Two doors on the last wall. So there is a lot of chopped up wall space.


It's hard to tell from this oh so amazing photo...but there is another window on the wall to the left. This would be the wall that our headboard is up against. The window that you can see has our dresser.


Now don't hate on our awesomely tiny master bath. The wall to the right, again is the wall with our bed on it. The tiny wall left of the bathroom door is where I have my jewelry armoire and my earring frame.

Trust me...I know these are awful pictures, but currently they are the best that I have. I can't...well not can't, but I won't paint the bedroom, so that's not an option.

DSCN0215

This is our furniture and bedding (Ashley Citron from Bliss Living). It is gray, yellow and white. The yellow is a very bright yellow with a very very slight green tinge to it.


So this is where I ask...no beg for your help. I have no idea what to do. I'd like the ideas to be cheap or even DIY.

Lay your ideas on me, I'd love to hear them!

I'll even try to get better pictures of the room today too.

8 comments :

Life: Let's make a deal

1/06/2011 06:55:00 AM Ashley 1 Comments

As I sat pining for those Born boots...Nate hatched a plan.

A plan that I, for one, can fully get on board with.

I mean the words "shopping spree" came into play, so how can I not be on board?

{via}

Then came the main condition. I have to lose weight. My first thought was...huh. Really? Then I thought some more. Asked some questions and really started liking the idea.

It's all based off of weight lost. Not a goal weight. So for every pound I lose I get a certain amount. On top of that I would get a bonus for every 10lbs lost. Which means I'm in control of how large or small my shopping spree is (within reason of course). Starting now, I have 5 months to lose.

Well, if I wasn't driven by clothing already (getting back into my own pretties) I sure am now! Granted I just might need to buy shoes...

1 comments :

Shoes: Boot of my dreams

1/05/2011 06:45:00 AM Ashley 1 Comments

I have a secret...as a shoe-o-holic I have failed. Not only have I not bought shoes in...I can't remember how long (I'm thinking before we moved), but I haven't had any kind of healthy shoe lust.

I began thinking that maybe I had finally hit my limit (240+), that maybe I just didn't need another pair of shoes. But I knew that was a lie, because I have two types that I desperately want (grey heels and a low heeled boot). Nothing has caught my eye and trust me I was looking.

Then everything changed tonight. We went to a department store and into their shoe clearance area. I never expect much, because it always feels like size 9+ is shopped out. As I dug through the piles I saw something peaking out.

There they were...my dream "low heel" boots.


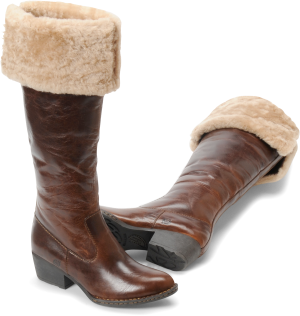
Say hello to Born's Clemens boots. I seriously wandered around with the one boot on for 15 minutes (they only had the right boot out). The whole inside of the boot is covered in shearling.

Mmmmmm.

Please excuse me while I drool.

They are exactly what I have been looking for and of course they are Born. Which means I could wear them all the time. Yes please.

No please to the price though. I'm going to have to keep watching for them to go on sale.

Please let them go on sale. I want them. No...I'll go one further...I need them!

1 comments :

Crafts: Dissecting the fleece rosette wreath

1/04/2011 11:11:00 AM Ashley 0 Comments

Remember how I took this...


{via}

And these...

IMG_1194

And made this...

IMG_1235

If you don't remember about it, you can read about it here. Heck even if you do remember you can still go back and read about it! Anywho, now I am trying my hand at something else using Styrofoam, pins and fabric circles.

All that's different is that I'm using these...


{via}

"These" being Styrofoam balls. And I am covering them in different red and black fabric.

What to chance a guess at why I'm making them?

Don't worry...I'll post the finished project soon!

0 comments :

How was your day?

1/04/2011 06:00:00 AM Ashley 0 Comments


This Life Calender is such a fun way to keep track of how your day was for the entire year!


I'd love to see what my (or anyone for that matter) mood leaned towards the most at the end of the year. Would it be happy? Angry? Bleh? Who knows...but now you can at least keep track!

Love it? Want it? Have to have it? Buy it here!

0 comments :

DIY: A place for military patches

1/03/2011 05:09:00 AM Ashley 2 Comments

This is a project I kept meaning to share with you, but then I didn't.

Bad Ashley.

This little DIY came about because of Nate' now lack of cubical. Which means he went from an office where he could display his random toys and nostalgia, to it being spread all across the house. One of those things were his patches that he has collected over the years. They were the smallest items, which should have been easy to keep out of the way, but they are Velcro. And we all know that stuff sticks to everything you don't want it to. So, I came up with a project to turn his patches into art. I figured not only is this a great idea for storing them, but he'll be able to hang it in his next office and keep adding patches on.

This was probably one of my easiest DIYs that I've done in a long time, but at the same time, probably one of my favorites. So pay attention (especially you military peeps...cause you know there are patches laying around your house)!


IMG_2766

What you'll need:


~Picture frame (I got mine from Hobby Lobby in the open frame section)
~Felt (Figure out how much you need after picking out frame)
~Foam board/core
~Spray adhesive
~Cutting blade
~Staple gun or hot glue gun
~Picture hangers
(optional)
~Hammer
(optional)
~Rubber door bumpers
(optional)


Step 1: Measure and then cut the foam board so that it fits into the frame.

Step 2:
Measure and cut the felt, making sure that you have about 2 inches of extra fabric all the way around so you can fold it over the back.

IMG_2771

Step 3:
Spray the adhesive onto the foam board (It's a really good idea to do this outside...so you don't make everything sticky inside. Yeah...learn from me and my mistakes).

Step 4: Lay fabric onto the foam board and smooth...smooth...smooth out those air bubbles!

Step 5: Spray the edges on the back of the foam board and fold over extra fabric. You can cut the edges to make the fabric lay nicer.

IMG_2772

Step 6:
Flip it over and admire the fact that everything is actually working and that the fabric is staying in place.

IMG_2774

Step 7: Staple...or in my case...staple...then realize my staples are too short and aren't going through the foam. Cuss. Then pull out the hot glue gun and glue that bugger to the frame.

IMG_2779

Step 8 (optional): If your frame doesn't have a wall hanger...attach one now. This means lots of measuring to find the center point. Do this...so you don't have to fight lopsidedness.

Step 9 (optional): If you're crazy like me, you hate when frames rub up against the wall. Stop this by adding a rubber door bumper on the each of the bottom corners.

Step 10: Now go gather up those patches and stick them on!

IMG_2782


A few of his patches didn't have Velcro on the back, so I just bought some and glued it on. That way they stick, but are still movable like rest.

This was such a quick and relatively cheap project. The price really depends on how much you spend on the frame and fabric. The adhesive is about a one time $5 hit, but I've been able to use it for a lot of other things as well. The foam board is usually about $3 or less. So really this project could be as cheap as $20, if not cheaper!

Most of Nate's current patches are from when he went to the Academy, but a few were given to him and others are his uniform patches from where he worked. This got hung in our current office next to a gift he got when he left his last job and his diploma. All of which, will go with him into his new office at his next station.

So there you have it...a DIY to start off the new year!

2 comments :